Why don’t I receive SMS sent via email?
Q: I receive SMS sent to my SMS-via-email address when using Outlook, but not using your software. How can I find what’s wrong?
A. Let’s check all possible reasons step by step. It is assumed your mobile services provider has sent you email-to-SMS gateway email address (it usually contains your login name or mobile number as part). Below we will refer to this gateway address as email-to-sms@gateway. Please do not forget to insert your real-life email to SMS address.
1. Please open “Tools -> Settings -> Email Settings”. In the field “To” email address (on top) please enter the email, i.e. email-to-sms@gateway (please don’t forget to enter the original email address afterwards, if it’s different).
Make sure SMTP server settings on this page are correct.
Now please click “Send test email alert” button. A pop-up window will appear, containing the log of communicating with SMTP server. If everything is good, the last line (white on green background) will read “Message was sent successfully”.
If the last line doesn’t indicate success, please attend to all the messages in that pop-up window, they contain information on what could happen. Please send the entire content of that pop-up to me if you need assistance finding the origin of the problem.
You can also refer to Why email alerts are not delivered Knowledge Base article for more details on this step.
We assume that step (above) detected no problems, or that the problems have been handled. Let’s create short test email alert and try sending it. If you use 3.5.8152 or older release of IPHost Network Monitor, please skip section 2 and refer to section 3 below.
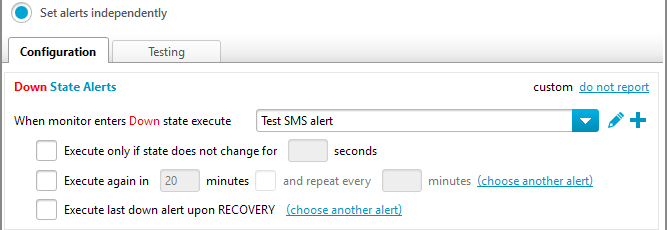
2. For 4.0.9991 and newer release: Please create a custom email alert with as little text as possible: open “Tools -> Settings -> Alerts”. Click “New” and name the new alert, for example, “Test SMS alert”. Click “Add” drop-down list and select “New Simple Action -> Send mail”. Now edit “To” field (enter email-to-sms@gateway address there), edit “Subject” (place a single word/letter there, just to make it non-empty), edit the full content (body) field: leave a single word in this field, for test purposes. Name the simple action, press “OK” to save it, select “Always” schedule from the “When” drop-down list and press “OK” to save the new alert. Click “Apply” and “OK” to close the Settings dialogue.
Now please create a monitor, for example, a simple TCP monitor for any host, e.g. for the monitoring host itself. Open the monitor Alerting tab on its Parameters/Results pane. Select “Set alerts independently” radio button on the top of the tab. After that select the alert we created above from the drop-down list for “When monitor enters Down state…” section and uncheck all the checkboxes in this section, if any, like in the sample below:
Switch to the Testing tab and open the first section by clicking on its header:
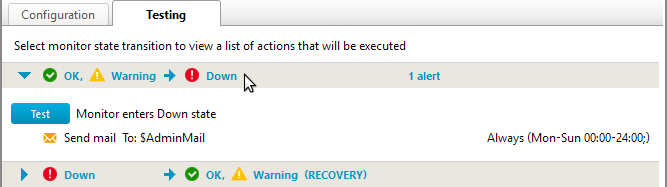
Click Test button on the left of the alert description to send the alert immediately, as if the monitor just changed its state to Down. Note that the monitor will not actually change its state. The window will show log and possible error messages:

Use the error messages to pinpoint the failure reason and to correct the alert settings.
3. For 3.5.8152 and older release: Please create a custom email alert, with as little text as possible: open “Tools -> Settings -> Alerts”. Click on “New”, select “Send mail”.
Please specify unique alert name in “Name” field.
Now edit “To” field (enter email-to-sms@gateway address there), edit “Subject” (place a single word/letter there, just to make it non-empty), click on “Content” and on ellipsis to the right, to edit the full content (body) field. Again, leave a single word in this field, for test purposes. Press “OK” to save new alert.
Now please create a monitor that will most certainly fail when started (such as TCP monitor trying to connect to a port not expecting on the host you create a monitor on).
Now in this new monitor’s properties navigate to “Alerting” section select “Custom” alert rule, click on ellipsis to the right. Click on “Add” in an opened alerting rule editor, select custom alert created on previous steps, select all checkboxes in “State changes” section and press “OK” to enable newly created custom alerting rule.
Now run the monitor and make sure that in Log view (below monitor properties) there’s line “”Alert [Alert name] executed” with alert name you assigned to test alert on previous steps.
If the test alert comes as text message, please consult your text messaging service on how long may be message sent via email. You could perhaps need to create new alerts used for sending as text messages, with as little text as possible.
For all releases:
More information on setting up alerts can be found in Alerting and Actions online help article.